Are you new to Github?
If you are, then start here for an introduction
Need help with Markdown or Jekyll?
Also have a look at the Resources section.
Quick access
- Blog
- Creating a blog post
- CSS in the default layout
- Project timeline
- Posts for the project timelines
- HTLM Changes to the Header and footer - Includes
- Looking for a template?
- Structure
- How the blog is structured
Blog
The Blog page has code to display any posts in the posts folder. The default layout is in the Layout folder: post.html
Creating a Blog post
Create a markup file in the posts folder and name it in the format :
yyyy-mm-dd-title.md
This date will be used to create the line at the bottom of your post:
Written on dd mmm, yyyy
At the top of your file, add the following lines:
---
layout: post
title: Welcome to this new blog
author: # (this is optional)
tags:  # to discuss, optional as a list:  ['a11y', 'communication', 'pattern'] for example
published:  # if you don't want it to be displayed yet, then the value should be false - otherwise put true or ommit the line all together
---
This will give the correct layout for your post, and use that title for the blog post itself and for it to be listed with the other blog posts.
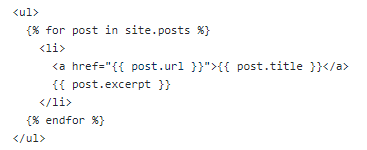
If an excerpt marker is defined in the \_config.yml file then you can mark a section of the post as the excerpt.
Everything above the <!—more—> code will be the summary we can see on the list of blog posts. Anything below can only be seen if you click on the blog post link.
<!--more-->
Add this line to the _config.yml to enable the excerpt marker:
excerpt_separator: "<!--more-->"
CSS in the default layout
default.html files in various repositories all points to the CSS generated by the SASS 3 files in scotentSD.github.io > sass >
jekyll-theme-slate.scssis the original sass for the slate theme (do not change)rouge-github.scssis needed for the slate theme (do not change)changes-to-the-main-themeis the changes we have made - this is where to make further changes if needed
These files are turned into one css file, by the code in this file: assets>css>style.scss
In the html template, the link is:
<link rel="stylesheet" type="text/css" media="screen" href="https://scotentsd.github.io/assets/css/style.css">
Project timeline
post.html files in project repositories all points to the CSS file called timeline.css in the Resource repository
In the post.html template, the link is:
<link rel="stylesheet" type="text/css" media="screen" href="https://scotentsd.github.io/assets/css/style.css">
This is different for the blog posts from the navigation menu. Any change needed to the css for the project timelines should be done in the Resource repository.
Posts for the project timelines
How to create a new post for the timeline
- open the file 2019-01-01-template.md in the draft or templates folder
- edit
- select all : ctrl+A , and copy Ctrl+C
- go to the _posts folder and create a new file there
- this file should be named with the same structure as the template, but also adding the reverse date after the name: yyyy-mm-dd-name-dd-mm-yyyy.md (don’t forget the .md!) The first reverse date will be driving the post order in the timeline, the second date after the date, make the name unique and will be used in the url to the post when cliked on. To create the name of the file: type the name of the file in the rectangle above the edit area it should say the-repo-name/_posts/ then the rectangle input box
- paste the content of the template ctrl+V
- make your changes
- save by commiting your file, enter your initials, and a short commit message
How to use the template
- do not edit the layout, it should be layout: post
- edit the title to what you want it to be
- type will change the colour background of your title: pick one between: lab, online, a11y, other, partner
- edit the phase: discovery, alpha, beta, live
- put your initials
- add the date. Format is: number in digits plus th, st, nd or rd Month in letters, and year
- optional add a url to go back to the timeline page using “” around it or leave blank if not needed
- optional add the type_of_event if you want it displayed added to the heading when the post is clicked on (Lab Testing, Partner co-creation and co-design, Accessibility, Online research and testing, Events, F2F and testing) or leave empty if not needed
- fill in the text of your post
- any files you want to link to should be uploaded before in the folder files
- to link a file,
[name of your file to display (type of file)](../files/name-of-your-file.extenstion)
Remember to mention what type of file it is in the text link. For example:
[Partner Prioritisation Spreadsheet (Excel file)](../files/SEP-Partner-Prioritisation-020819-V1.xlsx)
HTLM Changes to the Header and footer - Includes
If you want to change elements in the footer or header, you will have to do it in various default.html files, there is one in the layout folder of each repo:
- scotentSD.github.io
- resources
- posters
- personas
- practice
- sep
- international
- feedback
- a11y
You might have to change the post.html files as well in these folders.
Part of the code can also be in the folder includes. At the moment, you will find:
meta.html(this is all the meta tags in the header)analytics.html(this is for google analytics and is at the bottom of the body)nav.html(this is the menu in the header (Home, Blog, About Help)breadcrumbs.htmlthis is the code for the breadcrumbs just below the header- the project repo also have a
key.html(the code for the colour key)
Looking for a template?
Check the Resources repository first (the generic ones are there) or folders named templates or drafts in other repositories
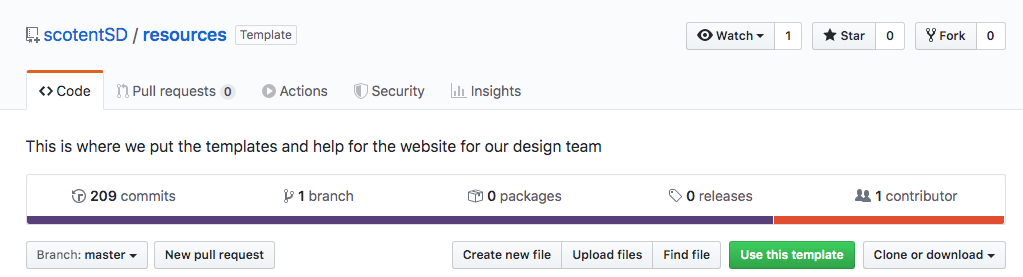
If you want to create a whole new project space, than use the Resource repository and from there select the green button like on the picture below ‘Use this template’ . This will then guide you to make a new repository with the same files and folder structure.
Once your new repository is created, you will need to make your first build:
- select Settings at the end of the top menu

- look for the Github Pages section on that page and there, select a theme (it has to be Slate) and click on the link to publish the website and view it (in the picture below these steps have been done already the link to click will be where you have the green background in the picture below)

Be patient, the build can take up to 10min.
Structure (on the 17/02/20)
Navigation menu:
- About
- Blog
- Help
From the homepage:
Worstreams
- SEP
- International Networks
- South of Scotland Enterprise
Learning, resources and techniques
- Accessibility
- Practice and Techniques
- Posters
- Resources
- Feedback
- Personas
How the blog is structured (25/01/2020)
By default, when you select Blog in the navigation menu, you get the latest blog displayed on the page, with a link at the top which could take you to the page with the list of blog posts. You can also navigate to the previous or next blog post. This pagination is using Jekyll variable (Paginator). There is no easy way to display the title of the previous / next post instead of providing a link to it.
From the list of blog posts
If you navigate the blog posts that way, then from here, you see the titles of the posts, the excerpt for it, and can select the title to see the whole post. At the top of the post, the breadcrumbs can take you back to the list.
Important files for the blog
- the CSS is the same as the whole website, some changes are in the changes-to-the-main-theme.scss
- the display of a blog post is coming from the layout for it: post.html this is all html instead of adding to the default layout because we had to modify the breadcrumbs in this one.
- the page with the list of blog posts is: blog-post-list.md
- the page called when you select Blog in the navigation menu has to be an index.html file for the Jekyll pagination variables to work. So this file is in a folder called Blog.
- every files for the blog posts are in the folder posts
Where to put the images for your blog post
Images for the blog posts should be in the images folder
Note: if your blog post is going to have a lot of images, then it’s best to create a folder for the post itself in the images folder, then in the blog post, when you need the path for your image, remember to use:

If you folder as a space in its name, the path name will need to have %20 instead of the space. For example, for the tube map folder, the path for the image is /images/tube%20map/